

Sinclair C5duino - Arduino Based Control Box
The new Sinclair C5 control box (named C5duino) I have been building is based around the Arduino Nano. With this microcontroller we can implement various sensors on the C5 whilst minimising the number of components required.
With version 2 of the board, we now have support for 24v C5's with the uni-8 controller, component lists for these boards are available below.
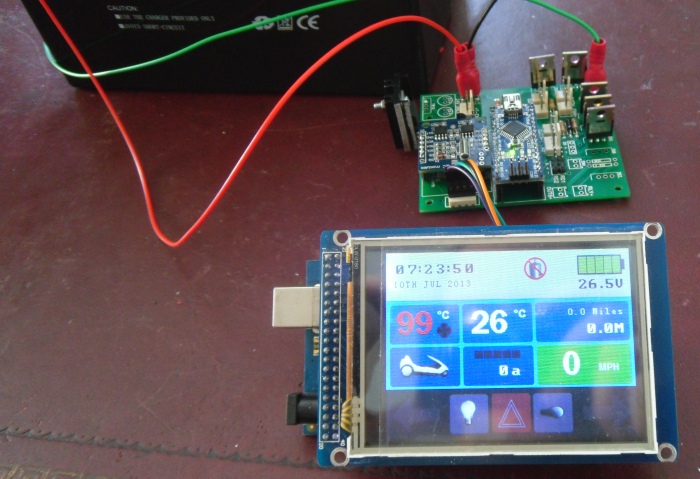
Like my earlier C5 Touch project, the new control box does the following:
- Monitor battery voltage.
- Monitor ambient temperature.
- Monitor motor temperature.
- Monitor motor current.
- Monitor C5 speed in Mph.
- Control a variable speed motor cooling fan.
- Motor control 12V relay for 12V C5's.
- Monitor the indicator switch and turn the indicators on/off accordingly
- Indicator flasher in software.
- Allow for hazard light (via serial input).
- Front/Rear lights (via serial input).
- External 12V Device control via serial input (e.g. Underneath Blue LED strips).
- Monitor time/date.
- Monitor total/session mileage.
- Security PIN, all electronics are disabled until the correct PIN is provided (except uni-8), can be disabled (via serial input).
- Pedelec mode if 2nd Reed Switch is fitted (Min/Max powered speed is configurable).
- Smart Drive mode increases battery life
- Motor over heating warnings, motor disabled (12V C5's Only) when the motor temperature exceeds 70°C.
- Battery voltage warnings, motor disabled (12V C5's Only) when battery voltage drops below 10.0V.
- Motor load warnings, motor disabled (12V C5's Only) when load exceeds 120amps for a period of time.
- All control is via serial communication.
Component List
To help sourcing the components needed to build the C5duino I have provided links to the relevant items on Ebay. It is up to you where you get your components from, the links I provide are purely to show you the item I am talking about.
24V Configuration
In this configuration the board requires 3 connections to the batteries (+12V, +24V & GND):
- Arduino Nano (x1)
- 10kΩ Resistor (x9)
- 3.9KΩ Resistor (x1)
- 100KΩ Resistor (x1)
- Diode 1N4001 (x2)
- LM35 Temperature Sensor (x2)
- IRF530 N Channel Power MOSFET (x5)
- 7809 Regulator + Suitable Heatsink (x1)
- Reed Switch (x1)
- 150A Current Sensing Module (x1)
- RTC Module (x1)
- Single Row PCB Header Sockets 15x2, 4x1 & 5x1
- 2 way Male/Female PCB Connector (x5)
- 3 way Male/Female PCB Connector (x2)
- 4 way Male/Female PCB Connector (x1)
- PCB Header Pins (x6)
- PCB Male Spade Terminal (x3)
- Large Project Box 145mm x 100mm x 60mm (x1)
- 4 Core shielded cable (2m)
You will need approriate cabling (I usually use 70amp rated cable) to connect the motor cable (GND) through the current sensor module and into the Uni-8 controller and back to the battery.
12V Configuration
In addition to the components needed for the 24V board you will need these additional components for the 12V configuration. Two battery connections are needed in this configuration +12V & GND.
- IRF530 N Channel Power MOSFET (x1)
- Diode 1N4001 (x1)
- 2 way Male/Female PCB Connector (x2)
- 12V 70Amp Relay (x1)
Again, you will need approriate cabling to connect the motor cable (GND) through the current sensor module and into the Relay and back to the battery.
Important: You will also need to place a rectifier diode (1N5404) across the +/- connections of the motor to prevent back EMF damaging the relay.
LED Lights
An important requirement of this project is the main lights and, if you have them installed, indicators, must be running from low power LED bulbs. Check out the shop for links to suitable LED bulbs.
Software Download
Here is the software for this project. You will need to download and install the Arduino program from www.arduino.cc and then upload this to your Arduino Nano board. Instructions for uploading programs with an Arduino are provided on the offical website.
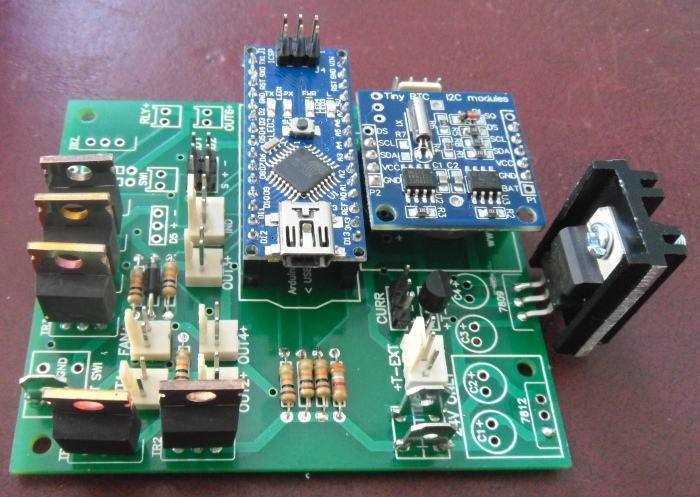
Gallery
Some images showing the construction of the board that will help with positioning of the components: