

Sinclair C5 X-POD
We all know about the original POD on a Sinclair C5. You know, 2 sets of LED's. One showing motor load and the other battery charge level.
This was all fine and pleasant for 1985 but less so for 2013. Especially when you use the C5 for travelling rather than just having it stored in a garage ready to be looked at once a week.
Of course if you're only interested in keeping your C5 looking original (1985 style) then this isn't for you. Though you may be interested in the POD ULA replacement modules that keep the original POD look whilst replacing the often unreliable ULA chip with an Arduino Nano.
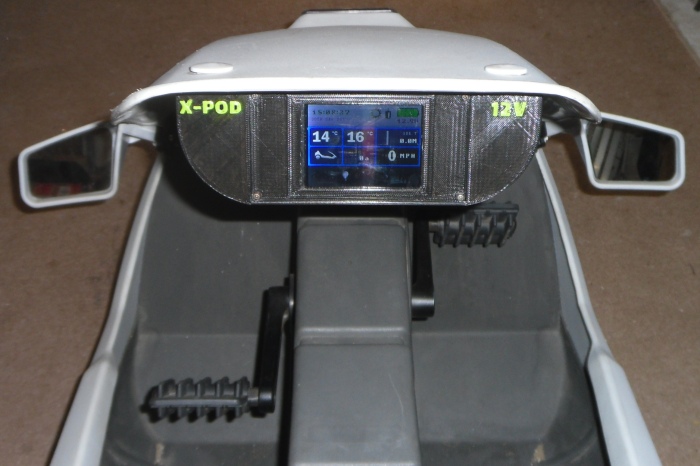
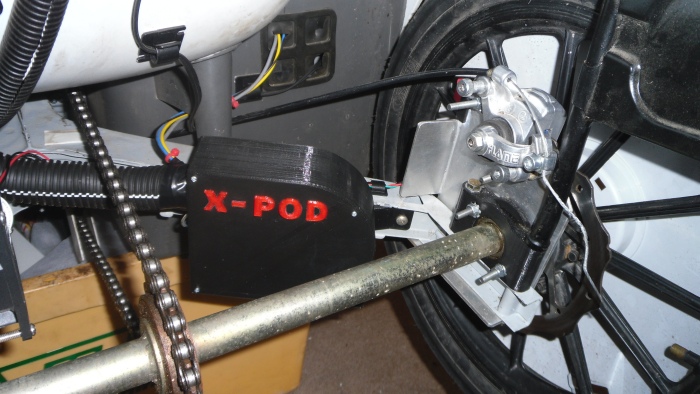
Here I introduce the X-POD. It has been under development for the last 9 months, starting out as a rough prototype circuit board with experminetal software before evolving into a fully functional product based around a professionally printed circuit board, carefully developed software and cutting edge 3D printed casing.
What Does it Do?
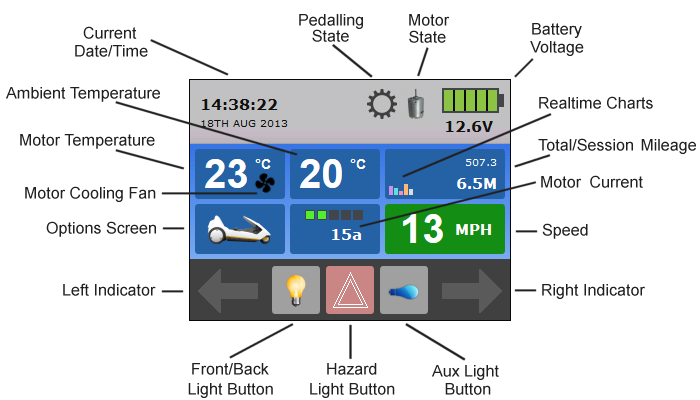
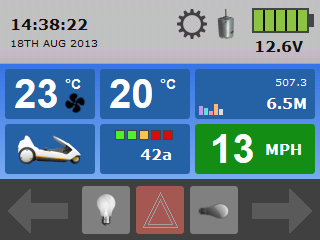
A whole lot of functionality is included in the X-Pod software. Here is an interactive demo and under that a screenshot of the main display explaining each section which will give you a rough idea of what is possible with this unit. A more detailed breakdown of all the functionality is included further down.
Time and Date
The current time and date is displayed in the top-left and can be configured using the options screen.
Pedelec Mode
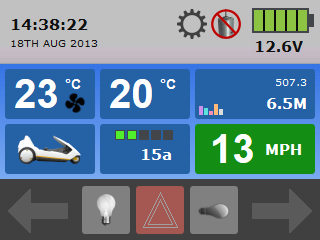
The Pedalling icon (top-centre) will animate when the C5 is being pedalled. If the Pedelec mode is enabled this will turn Red if you are not pedalling and try to use the motor. It is also possible to configure a minimum and maximum speed when the motor can be used.
Motor State
To the right of the Pedalling icon is the Motor State icon. This displays whether the motor can be used or not. Usually the motor can be used unless certain conditions arise, such as low battery voltage, high motor temperature or high motor current readings.
The motor will flash with the Red warning circle shortly before the motor is disabled.

Battery Monitor
Battery health is displayed in the top-right of the screen. There is a 5 segment battery gauge as well as the number of volts remaining underneath allowing you to see exactly how much you have left.

Motor Temperature
It is important to know when the motor is being overused and is heating up too much. For this reason the current motor temperature is displayed and should the temperature exceed 70°C the motor will be disabled until it has cooled down.
To help with this a PC brushless fan can be attached to the motor and this will be enabled when the temperature reaches 30°C. The higher the temperature gets, the faster this cooling fan will spin providing an efficient way of cooling the motor.
You can also press the button to see a line graph of recent motor temperatures.
Ambient Temperature
To the right of the motor temperature is the ambient temperature. This sensor is located at the back of the C5 outside the control box.
You can also press the button to see a line graph of recent ambient temperatures.
Total/Session Mileage
The X-Pod keeps a record of the total distance the C5 has travelled along with the distance travelled for the current session.
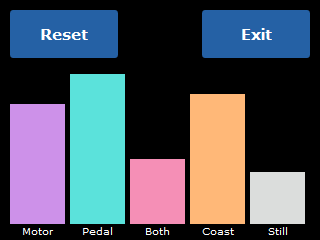
With the help of some extra sensors the X-Pod can generate useful charts detailing motor usage, how much it has been pedalled, how much coasting and also how much the C5 has remained idle. To access this chart data press the Total/Session Mileage button.
Motor Current
There is both a 5 segment gauge and also a precise value (Amps) to give you an indication of how much load the motor is under. The gauge should ideally show 2 Green segments or less, when it shows Red you should think about pedalling to assist the motor.
You can also press the button to see a line graph of recent motor current values.
Speed
A simple display to show you your current speed. You can also press the button to see a line graph of recent speed.
Configuration
The configuration screens allow you to set the Date/Time, Security PIN, Safety Mode On/Off, Pedelec On/Off, Smart Drive On/Off and the Display MPH/KPH.
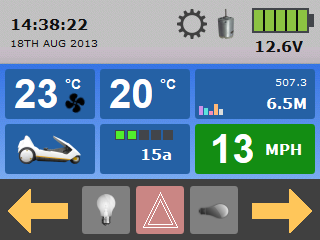
Indicator Arrows
These provide a visual indication that one of the indicators is on and will flash in time with the indicator bulbs on the side of the C5.
Front/Back Lights
To activate the fron and back lights on the C5 you now press this button on the touchscreen. The icon will light up to show you pressed it and the lights are on. Press again to turn them off.
Hazard Light Switch
This button turns on both sets of indicator lights to give you a hazard light function.
Auxiliary Lighting
An optional set of LED lights can be installed under the C5. This button is then used to turn them on and off.